A Button Comes Loose Before a Trip: A Small-Repair Plan
Loose button repair before a trip can stay small: inspect the fabric, choose a sensible thread, and sew the button securely without changing the garment.
The most common mistake in loose button repair before a trip is pulling the button tight with the first thread to hand. That can pucker the fabric, snap weak thread, or turn a simple fix into a torn buttonhole. Pause long enough to see what has actually failed; the repair is usually smaller than the panic suggests.
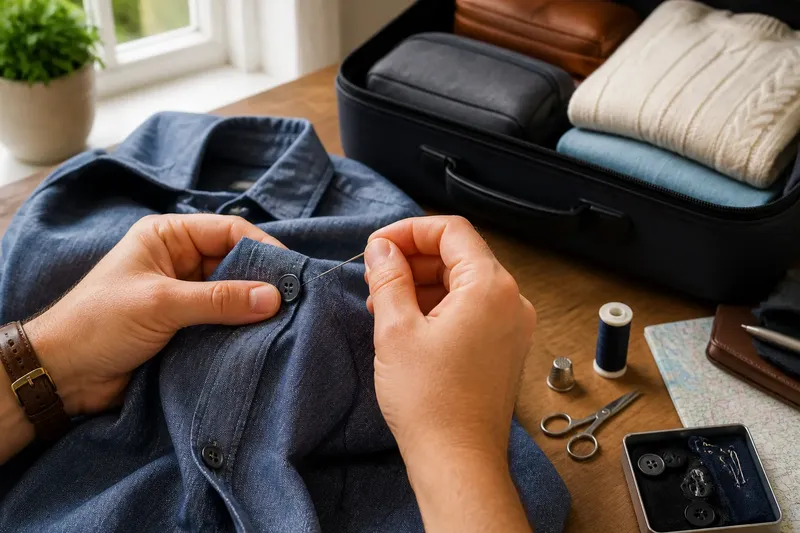
Work on a table with good light. Gather a hand-sewing needle, sharp scissors, matching thread if you have it, and a spare button if the original is missing. A thimble can help if the fabric is dense. Before you start, fasten and unfasten the garment gently so you can see how the button sits and whether the nearby cloth is sound.
What has actually come loose?
Check whether the button itself is loose, its thread is fraying, or the fabric beneath it is damaged. These are different problems, and treating them as one can make a tidy repair harder. Look at the underside too: a small knot, thread tails, or a loose backing button may reveal how the button was originally attached.
- Loose but intact button: The threads have slack or broken strands, while the cloth and buttonholes look normal. Re-sewing the button is usually the direct fix.
- Missing button: Check the garment’s spare-button packet, inside seams, and pockets before substituting one. A close match in size and shape is more useful than a perfect color match that will not pass through the buttonhole.
- Frayed fabric or stretched holes: The button may have pulled against weakened cloth. Avoid tightening the new stitches; a tailor or clothing-repair professional may be the better choice if the area is tearing.
- Buttonhole damage: If the slit is unraveling, snagged, or too tight for the button, sewing the button more firmly will not repair the hole. Keep the garment closed with a temporary, gentle fastening if needed and arrange appropriate repair.
For a button on a jacket, coat, or other garment that carries tension, inspect the fabric around it especially carefully. A loose button on sturdy cloth is a straightforward sewing task; a loose button attached to a rip is not.
Which thread should you choose?
Use ordinary sewing thread that resembles the original in color and thickness. If the garment is dark, compare thread against the cloth in daylight or under a bright lamp; a slightly duller shade often disappears better than a brighter one. For a patterned garment, match the color at the button’s location rather than a color elsewhere in the print.
Thread from an existing sewing kit is fine if it is smooth and strong enough for the garment. Avoid fuzzy, brittle, or visibly weakened thread. Thick embroidery floss can crowd small buttonholes, while very fine thread may not suit a heavy coat button. If you have only a close color rather than an exact match, choose the one least noticeable from the front.
Check the garment’s care label and any maker’s repair instructions if they are available; they can matter for delicate or specialty fabrics. For an everyday woven shirt, a general-purpose hand-sewing needle and matching all-purpose thread are often suitable.
How do you sew the button back on?
- Mark the position. If the old thread remains, use its stitch holes as a guide. If the button has fallen off, line it up with the matching buttonhole and mark the center lightly with a removable fabric marker or a pin. Confirm that it sits level with neighboring buttons.
- Prepare the thread. Cut a manageable length, thread the needle, and knot the ends together or use a secure starting knot. Avoid an excessively long strand, which is more likely to tangle.
- Start from the underside. Bring the needle through the fabric at the button’s center, then pass it through a buttonhole. Keep the knot on the inside. If the original stitch holes are still clear, use them rather than making fresh holes.
- Build an even attachment. Sew through the holes in a consistent pattern, such as parallel passes or a small cross, depending on the button’s holes and the remaining stitch marks. Keep the button steady, but leave enough space beneath it for the fabric to sit naturally.
- Finish securely. On the underside, make a small finishing stitch through the thread loops, then knot close to the fabric without pulling it into a pucker. Trim the tail neatly.
A two-hole button usually needs repeated passes through each hole. For a four-hole button, follow the existing pattern if you can see it; otherwise, sew through opposite pairs in a simple, even arrangement. Don’t force the needle through a buttonhole or push hard against your fingers. A thimble helps with firm fabric, and a sharper needle may be easier than extra pressure.
Why does the repair pucker or feel too tight?
The button may have been pulled flush against the cloth, leaving no room for the buttonhole edge to slide underneath. A thread shank—the small space between button and fabric—helps a button close comfortably, especially on thicker material. For a flat, lightweight shirt, the gap can be modest; a bulky coat needs more room.
If the fabric puckers, stop before adding more stitches. Carefully unpick the tight passes, smooth the cloth flat, and sew again with the button held slightly above the surface. The aim is a firm attachment without drawing the fabric into a ridge. Don’t compensate by tugging harder on the final knot.
Imagine you find a loose shirt button while packing, with the old thread still visible and the cloth undamaged. You choose a dark all-purpose thread that blends with the shirt, reuse the original stitch holes, and leave a little room beneath the button. The expected result is a secure button that closes normally, without a new mark or a puckered patch.
What if the needle, button, or fabric resists?
If the needle will not pass through the cloth easily, do not force it. Check that the needle is appropriate for the fabric and that you are not trying to pierce a thick seam allowance or button reinforcement. A stubborn spot can signal dense construction, but it can also mean you are off the original stitch path.
If the button is cracked, sharp-edged, or missing, choose a sound spare with holes that align with the garment. A button that barely squeezes through its buttonhole can strain the stitching and be awkward to use. For a temporary travel fix, a safe spare from the garment’s own packet is preferable to a decorative substitute that catches or snags.
When the fabric begins to split, the buttonhole is unraveling, or the garment is valuable or difficult to handle, stop and ask a tailor or clothing-repair professional. A quick button repair should not require sacrificing sound cloth around it.
How can you check the repair before packing?
Fasten and unfasten the button a few times without yanking. It should pass through the hole without a struggle, sit flat when closed, and remain steady when lightly moved. Inspect the inside for loose thread tails that could catch on a lining, and check that the knot has not made a hard lump against the skin.
Keep the needle, a small amount of matching thread, and a suitable spare button in a compact sewing kit if you travel with garments that use buttons. Loose button repair before a trip is easiest when you have time to check the cloth and choose a sensible match; a calm inspection is often what keeps this small mend from becoming a larger alteration.